Well, not very accurate title. In fact, we cannot place a macro itself on the toolbar or menu. Instead we can create a button for it. But let's start from the beginning.
You have created your super macro which saves you a lot of work in Visual Studio .NET (see how to create macro). It works perfectly, you love it and you want to use it as often as possible. But locating it in Macro Explorer and double-clicking its (sometimes quite long) name isn't the best idea. What you obviously want is to have a button on VS .NET toolbar or an entry in main menu which runs your macro when clicked. And of course you want to add some nice icon to your button. Today I'll show you how. It is even possible to add your macros or commands to right-click context menu. But this is more difficult and I'll show you this next time.
To place a macro on toolbar or menu:
- Go to menu Tools - Customize... (or right-click on any toolbar and press Customize...)
- Switch to Commands tab.
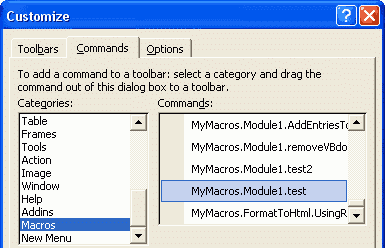
- Now you should know that your macro behaves similarly as named commands in VS .NET. It has its unique name and you can find it under "Macros" category. So select "Macros" in Categories.
-
Select your macro under Commands. Macro name is self-explanatory. For example test macro that we created the last time is named MyMacros.Module1.test.
-
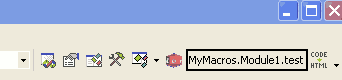
To place it on the toolbar: Drag and drop it on the toolbar where you wish it to appear.
To place it in the menu: While still in Customize mode, open required menu and then drag and drop macro from Customize window to this menu.
Please note, you cannot place the macro or command on context menu in this way. You simply cannot invoke context menu in Customize mode. You need to use more difficult technique for this which I will describe later.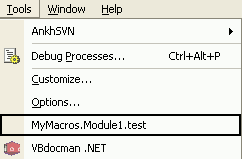
- Close Customize window.
Now you can click your buttons on toolbar or menu to invoke your macro. As you can guess, we're going to customize the appearance of our buttons. We want to change the text, tooltip, icon and visual style (icon, icon+text, text). To customize the button on toolbar or menu:
- Go to menu Tools - Customize... (or right-click on any toolbar and press Customize...). Customize window will open but you can ignore it.
- Locate your button on toolbar or menu and right-click it.
- Change from Text Only (Always) option to Default Style. This will display only button icon on toolbar and icon and text in menu. For now there is no icon yet so you will see only empty space on toolbar.
- Right-click the button again and change Name. This will appear as text in menu and as tooltip on toolbar.
-
Finally, you'll add some nice icon. Right-click the button again and you have three options now:
- Press Change Button Image. You can select from a very limited set of predefined icons. If it's OK for you, fine.
-
You can Paste Button Image. To do so, you first need copy some image to the clipboard:
- Use other VS button's image. While in customization mode, locate that button, right-click and press Copy Button Image. Then get back to your button, right click and Paste Button Image. This approach is very good because it supports background transparency. But you are limited to existing icons.
- Open your own bitmap in any graphics editor (including Visual Studio) and copy it to the clipboard. The image should be 16x16 pixels but it will be automatically resized if it has different size. This enables you to use any image but you cannot define transparent backgrounds. Transparent information is not persisted even if you copy .ICO file. Add-in developers know magic color #00FE00 which is used as transparent when they provide icons for their buttons in satellite assembly. But this color doesn't work here. You'll need to edit your icon later manually to add the transparency.
- Edit Button Image manually. Very simple icon editor appears. You can edit your existing icon. It is for example useful when you pasted your image and want to add transparency. Just select Erase color and paint all pixels that should be transparent. It will only take a minute.
That's all. As you can see, you can similarly customize, add or delete built-in toolbars and menus as well.

